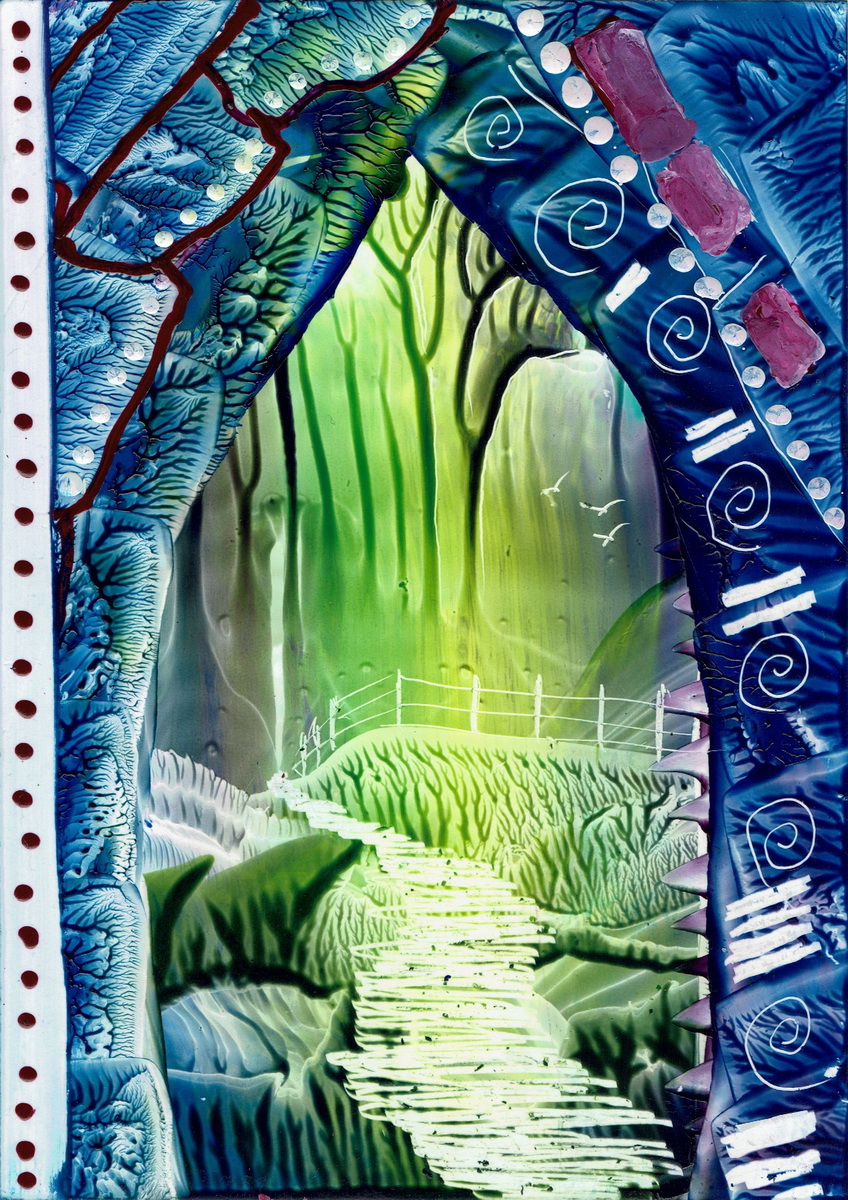
How to create a Fantasy Scry
Create a fantasy image in Encaustic Art. Discover the exciting opportunities to create imagined worlds and places using molten wax colours applied with the iron.
Steps
- Load the iron with bands of colour, reflecting the same on each side. Start in the middle with the lightest colour which is Mid Yellow (44) then add bands of Blue Green (08), Red Violet (12) and Prussian Blue (18).
- Bed the iron down onto an A6 card and slide it across, leaving the wax deposited. One iron full of wax covers one A6 card.
- Whilst the wax is still warm, put the iron back in the starting place and lift the trailing edge of the iron slightly off the card whilst moving the iron along and slightly upwards off the surface. When done correctly, wonderful dribbled wax patterns will be formed. This suctional effect produces lovely fantasy results; backgrounds that can be worked into!
- Allow the wax to cool, then pick up the card and begin working into the foreground area. Light moving wriggles or dabbing can be layered to give interesting depth and form. Of course, each background will offer different opportunities and possibilities, so the key to success is to look carefully at the background you have created and then work sympathetically into that potential, usually focusing on the light or calmest areas.
- If the image could benefit from it then try putting on a border, but again, be sensitive to the qualities that exist in your own creation – there is no fixed formula for fantasy work – it develops and evolves as you work on. Explore and alter the borders if you feel that what you did is not the best that you could do. Or be simple and leave a good clean effects border if the first one feels right to you. You are the creator!
- In the video image an iron shaped doorway was finally created using the dark Prussian Blue (18) wax, to form a sort of frame and a bit of mystery too, now looking into a fantasy realm through that door.
- The scribing tool scrapes off wax. It can be used as it is but it can be refined with a little work, and this is a good thing to do for very careful and accurate usage. Take a 600 grit (very fine) abrasive paper. There is one already in the Stylus Pro box. Carefully sand down one of the blades into a sharper edge which can be slightly curved too. Before finishing, use the abrasive paper to soften or “slightly blunt” that sharp edge. It should not be able to cut!!
- Use the scribing tool to add details; small symbols perhaps or try following and highlighting lines already in the image pattern. Whatever you feel will add and enhance the image so far created.
- As you look at the initial background (through the archway in this image) think about how it cold be developed with either scriber or Stylus (or both). A path has been added, keeping the scraping marks left by the blade horizontal and parallel to the card’s bottom edge. And a fence has been added to bring interest and help pull the eye further into this image, this growing fantasy illusion. Adding birds gives life and movement to the image. It helps reinforce the idea of a real space and depth existing. It is after all just a flat card covered in wax colours!
- To introduce “clean” and pure colour into the image it helps to first remove the existing wax in those areas using the scriber to scrape it off. Remember to wipe lightly with tissue until all the crumbs and shards of wax colour are cleaned away. Then use the Stylus Drawing tip (or brush head if you are doing large areas) to apply fresh clean pure colour onto the revealed white card.
- Use the Stylus to add outlines or rows of dots for decoration.
- Heat a strip down one edge and whilst it is still warm take a tissue and wipe off the colour. Again, the card surface is revealed, although it may still be slightly coloured. Then new decoration can be added with the Stylus. Another row of dots in our example image here.
- Polish the final image and use the pointed end of the scribing tool to remove and small fragments of wax if necessary.
- To add a tough acrylic coating, make a cloth pad into a ball shape, apply some of the sealer over the card with this ball and then finish with a bouncing dabbing action to get rid of all those sealer application lines and unevenness. The dried sealer surface (allow 30 minutes) will have a sheen very similar to the polished wax itself, but now that surface is far more resistant to scratch and handling marks.
- Enjoy your fantasy journeys, but remember that the initial effect is the basis for the rest of the image, so get good light and interesting effects into that right at the beginning.
Products Used
- Encaustic Art Painting Iron (Art.99530100)
- Encaustic Art Wax blocks
- – Mid Yellow (Art. 99534944)
– White (Art. 99534916)
– Red violet (Art. 99534912)
– Blue green (Art. 99534908)
– Prussian Blue (Art. 99534918)
- – Mid Yellow (Art. 99534944)
- Encaustic Art A6 painting card (Art. 99537100)
- Encaustic Art Stylus Pro with drawing tip (Art. 99530605)
- Encaustic Art Workplace protection paper (Art. 99537010)
- Encaustic Art Scribing Tool (Art. 99531015)
- Encaustic Art Wax Sealer (Art. 99536001)
- Tissues from the local grocery – large size double ply tissues are ideal.

